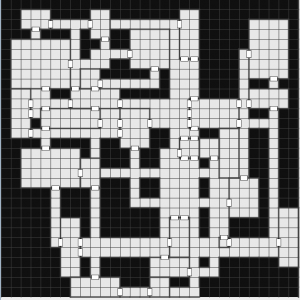
Dungeonographer Gets a (Free) Random Map Generator

One of the reasons I created Dungeonographer was to have a robust random map generator with the ability to fully edit the map after the fact. Somewhere along the line I got busy with other projects as well as different aspects of Dungeonographer… and honestly I forgot to do it!
But about a week before GenCon, I finally wrote this feature into the tool. GenCon prep and wind-down has kept me too busy to post about it until now.
Configuration
To set the properties related to the random dungeon generator, click the “Configure Random” button on the center-right part of the Dungeonographer setup/splash screen. This opens a pop-up window with the following fields:
- %Area Used for Rooms: Basically, what percentage of the map’s squares do you want devoted to rooms. (This value does not count corridors.) You can set it to as low as 10% (a sparse dungeon with lots of solid rock area) to 80% (a map that has almost all rooms and small corridors.) 30% is the default.
- Wall Style: The algorithm will automatically add wall segments around the rooms and corridors, if desired. This allows you to set the wall’s texture. The default is a “medium rock wall.”
- Add Walls Around Rooms: Keep this checked if you want the software to automatically add walls around the rooms.
- Add Walls Around Corridors: Keep this checked if you want the software to automatically add walls around the corridors. Note that the walls around corridors are done as small 1-square-long segments, so if the algorithm does the corridor walls there many be many to move/remove. Walls for rooms are done as longer segments.
- Add Doors: Keep this checked if you want the algorithm to add doors where most corridors meet rooms. Note: When the “%Area used for Rooms” is very high, the algorithm adds lots of doors, so you may prefer to un-check it in such cases. On the other hand it may be easier to simply remove the extra doors.
- Add Corridors: Un-check this if you want to add your own corridors between rooms.
- Room Floor Tile Type: Pick which floor tile style you want for rooms.
- Corridor Floor Tile Type: Pick the floor tile style you want for corridors. Note that the room and corridor floor styles may be the same.
How It Works
To generate the map, click the “Generate Map” button on the “Random Dungeon Settings” pop-up window or click “Generate Map” on the map setup/splash screen while the “Random Dungeon” button on the same screen is selected.
Here’s the basic algorithm:
- Pick a spot for a room and pick a room size. If it doesn’t fit on the map, retry.
- Draw a wall around the room if the option is checked.
- Repeat #1 & #2 until the number of squares used for rooms meets the desired “%Area Used for Rooms.”
- Pick the first and second room added to the map. Draw a corridor from the center of one to the center of the other. If the tile is already a room floor tile, don’t change it.
- When a corridor comes out of a room or into a room place a door (if there isn’t already a door there.)
- Repeat #4 and #5 for the second and third rooms, the third and fourth rooms, and so on.
- Check the map square by square and add walls if a corridor tile is adjacent to a stone-filled area.
Upcoming Features
(Some of these will be pro-only features.)
- Allow for irregularly shaped rooms.
- Allow for special room types such as a cell block, cluster of officer’s rooms, etc.
- Allow the user to set some properties to stock the rooms.
- More user-configurable properties. For example, minimum and maximum room size.
- Cut down on numbers of doors added when there are many rooms.
- Improve the drawing of corridor walls. (Use larger line segments when possible.)
Don’t Forget
And if you haven’t tried Dungeonographer, the free version is very robust and includes the random map generator feature. Here are a couple of other key features:
- All icons come in two styles: classic/line art and semi-realistic/battlemat versions. There are a number of floor tiles in both formats, wall styles/textures, and map objects (doors, stairs, beds, chairs, etc.)
- You can always switch between the map styles with just one click.
- When saving or printing the map, you set the dpi and number of squares per inch. So you can make a one-page DM’s map by setting the dpi to whatever quality you want and set it to 4 or 5 squares per inch (like graph paper) or you may print a battlemat by changing to the battlemat icon set and set the map to 300dpi and 1 square per inch.
- When saving or printing the map in the line art style, click one checkbox to recolor it in the classic blue color used for inside-cover module maps. Click a different checkbox (or both) to get an isometric view of the map.
